CNS made some beautiful 3D models of Iran’s IR-1, IR-2M, and IR-4 centrifuges for the NTI website. These weren’t easy to make. Fortunately, we have some smart, innovative, hardworking students. Bo Kim’s just finished her first year as a Nonproliferation and Terrorism Studies student at MIIS and is dividing her summer on campus between a CNS and a Cyber internship. Watch out future employers, she’s fluent in Korean too! Without further ado, Bo will explain how she took the measurements to make the IR-1.
Author: Bo Kim
Centrifuges, like the rest of us aspiring Instagram models, suffer from bad photo angles.
If you look closely, (or accurately measure as I will shortly) the ends of the centrifuges are smaller (i.e. further away) than the middle of the centrifuge, where the camera is positioned. There are several great open source tools that correct pincushion or barrel distortion, such as Hugin or Gimp 2.8. However, I found that Photoshop’s Perspective Warp function was more user friendly with a smaller margin of error.
Photoshop’s Perspective Warp Tool
1. Drop image into Photoshop and create a new layer via copy. (Precautionary measure.) Layer > New > Layer Via Copy
 2. Perspective warp the new layer. Edit > Perspective Warp.

A menu of options will appear in the navigation bar. Click ‘Layout’ to see a box pop up inside the image. (shown in red below).

3. From here, move the four corner pins to match the face of the centrifuge.

You’ll already see here that the edges of the centrifuge are not perfectly linear. If you look closely, the holes of the bisected coils start out in line with the red perspective box, and moves off the line as the line progresses.

Then, hit ‘Warp,’ and the inner grid will disappear.

From here, click the ‘Vertical/Horizontal’ alignment button, and the centrifuge is now rectilinear. You can see the warp on the side.

To reduce the margin of error, I photo warped both of the IR-1s in this image, plus as many IR-1s as I could find, and averaged the measurements. After several nights of wanting to gouge out my eyes, I finally came up with numbers that added up. Skepticism forced me to compare the measurements of the centrifuges with and without the perspective warp, and while no photo is ever going to be a 100% accurate, I’ve noticed that when building the 3D models, the measurements from the perspective warped photos seemed to be truer to the original images.

Web Plot Digitizer
Now on to WebPlotDigitizer to measure the freshly warped centrifuges! File > Load Image….
 Choose appropriate file, then load.

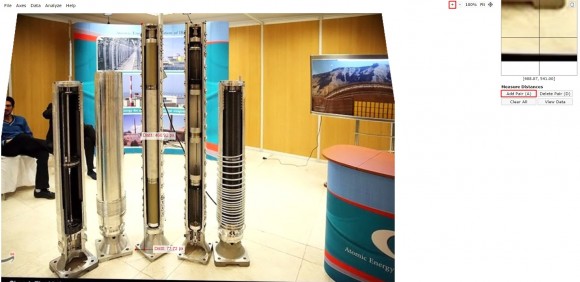
For measuring images within photographs, I always go with Plot Type: Image. Then ‘Align Axes.’

Then, at the top, ‘Analyze’ to ‘Measure Distances.’ From here, I hit ‘Add Point’ on the right every time I want to add a new measurement.

You’ll also see here on the right, that there is a zoom window. You can use the ‘+’ or ‘-‘ buttons to zoom in or out. The zoom window will move when you mouse over the image. The intersecting lines in the zoom window helps pinpoint the starting measurement.

The first measurement I made was a horizontal line to define the floor. The camera angle of this photo plus the color of the floor make it very difficult to define a flat surface from where we can start measuring. Luckily, we can see in this photo the shadows of where two opposing ends of the centrifuge touch the floor. I drew a line here from edge to edge to define my horizontal axis, as well as the hypotenuse of my base. Simple math (including diagrams) coming up.

I then measured the height using Project Alpha’s calculation.
I measured from the top of the centrifuge to the defined floor.
Now for the simple math.
Project Alpha says our total height is 210 cm.
Webplotdigitizer gives a distance of 460.92 units.
So setting up my calculations: known = (unknown) (constant)
210 cm = (460.92) (C)
C = 0.456
This constant, C = 0.456 must be multiplied to all of the measurements in this image. Like a numerical scale.
One last tiny bit of math.
The base distance is 77.72 units in Webplotdigitizer. So multiply that with the constant and I know the length is 35.44 cm.

If you loved geometry (anybody?) then you’ll remember the hypotenuse of an isosceles triangle with sides x is √ 2 X.

So, that gives us:
√ 2 X = 35.44 cm
X = 25.06 cm
Seems about right.
Now for the rest of the measurements, I’ll just give you a quick snapshot of my final marked-up product:
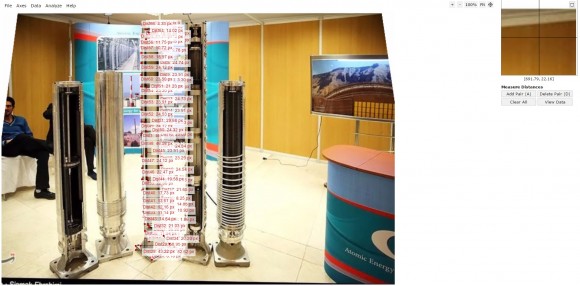
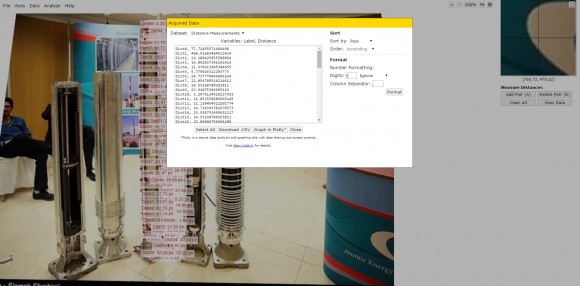
Yes, I really did measure every nook and cranny on these centrifuges -for several images, of several centrifuges, several times. I found it useful to do two separate images in Webplotdigitizer- one for horizontal measurements, and one for vertical. If some of the measurements are ever hidden, or if you’d like to keep track of the data, you can hit ‘View Data.’
SketchUp
Once you have all your measurements, you can then move on to 3D modeling!

And if you start feeling nostalgia for the math, you can move on to next level centrifuging- counting the number of centrifuges in Natanz, geolocating the facilities, and then lovingly placing each centrifuge into a cascade. 50,000 centrifuges will guarantee you a hat tip from the Grand Guru herself, Melissa Hanham. (Which will likely be immediately followed by requests to recolor, rearrange, recount, remake, and rerecord everything.)[<–MH Edit: By Grand Czar Jeffrey Lewis]
Happy centrifuging.

Speaking of bad angles, it puzzled me that Fred Kaplan refers to them as “spinning paddles.” Then I realized he’s probably thinking of the standard two-dimensional cutaway diagram of a centrifuge, and if you don’t mentally extrapolate those into three dimensions, they are in fact paddle-shaped. Notwithstanding that pretty striking error (assuming I’m not overlooking some plausible alternate explanation), Kaplan manages to write thoughtful analysis of related issues.
I missed the reference to “spinning paddles.” That’s so weird; I never considered that someone might mis-interperet this sort of cut-away as a paddle. http://www.jnfl.co.jp/english/business/img/uran-centrifuge.gif